Powertrain Part 1
Just like Christmas for a kid, the next part of the build couldn’t come fast enough. But finally, it was time to transplant the heart into our build— a GM LS3. We decided to use the LS3 because with its aluminum block and heads, it weighs in about 80lbs lighter than the cast-iron version of equal displacement. We also love that it makes 430hp stock which is plenty for this build. Another benefit is that we won’t have to spend money on upgrades like we would trying to get the same horse power out of an LS1 or 2. We found an LS3 removed from a wrecked 2010 Corvette with 61k miles on the clock. Perfect! We made a deal and a week later it showed up on our door step.
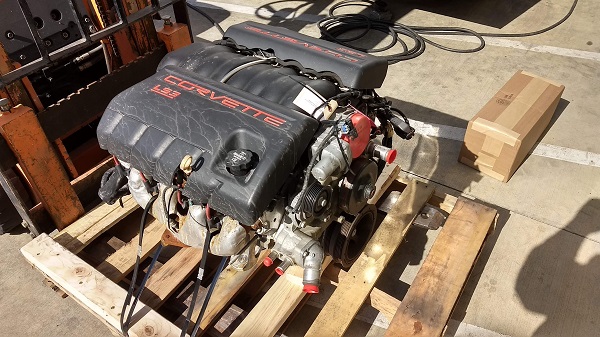
The engine came with no accessories (alternator; A/C compressor; power steering pump), but that’s OK since the GenRight Tracer kit requires specific part numbers for these accessories and we’d need to buy them separately anyway. We liked that our LS3 came with the Corvette oil pan that has the sump in the rear as opposed to the Camaro version that has a forward sump and would need to be changed. Less work and easier on the budget is a win-win!
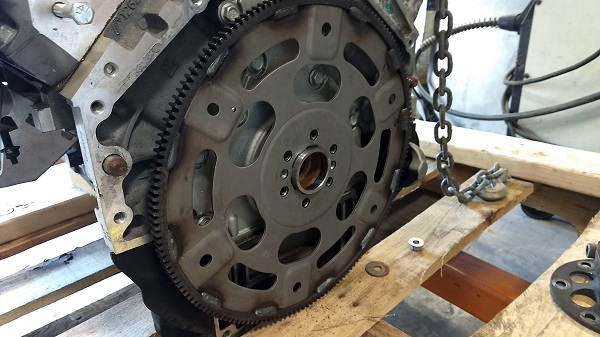
The donor vehicle was equipped with a manual transmission, so all we did was grab a new flex plate from Maximum Transmission and swapped it out.
The GenRight Tracer kit also requires a different water pump to make room for the alternator/power steering pump brackets. The Tracer instructions include all the required part numbers, which makes rounding up parts pretty easy. By this time in the build, we were really grateful for GenRight’s helpful and thorough step-by-step installation manual.
Our choice of transmissions was a no brainer. When we built Rocksanne, a buggy that weighs 7500 pounds without passengers, we had Chris at Maximum Offroad Transmissions build us a Turbo 400 in a Reid Racing case with a Hemi bell housing. It has held up flawlessly running hardcore rock-trails as well as speeding at 100+mph in the desert, so we felt Maximum Offroad Transmission was the only choice for our new build. For our LJ, we knew we wanted a “dumb” transmission meaning non-electronic, like a Turbo 400, but with an over-drive since this car will be driven on the street quite often. Chris at Maximum Transmission built us a beautiful 4L80 package that included a Winters reverse pattern shifter, Flex plate with ARP bolts, 2800 stall Torque converter, and a Lokar dip stick. The 4L80 is an electronic transmission, but we ordered it with a manual valve body with a reverse pattern to replace the electronics. This transmission package has our 100% confidence! 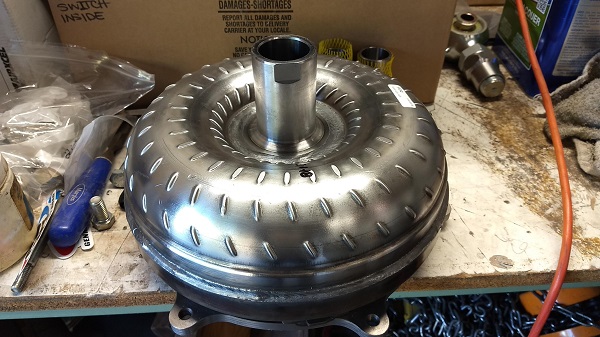
The transmission will no longer be a full automatic and will need to be shifted up and down. There are multiple benefits here:
1. We don't need to deal with a transmission control unit, or TCM;
2. The install ends up much simpler;
3. Selecting when the transmission shifts gives better control over the vehicle when off road.
The downside is having to shift manually while street driving. The reverse pattern changes the position of the forward gears which allows first gear to be adjacent to neutral. But we’re happy to compromise because this shift pattern is very useful when negotiating complex rock climbs where a quick reverse could save the day.
After changing the flex-plate we poured about 3 quarts of Royal Purple Automatic transmission fluid into the torque converter and let it settle in. Then we installed the torque converter into the transmission and coupled it to the engine using grade 8 bolts with washer heads. So easy! Next, we installed the bolts that connect the torque converter to the flex plate and torqued them down.
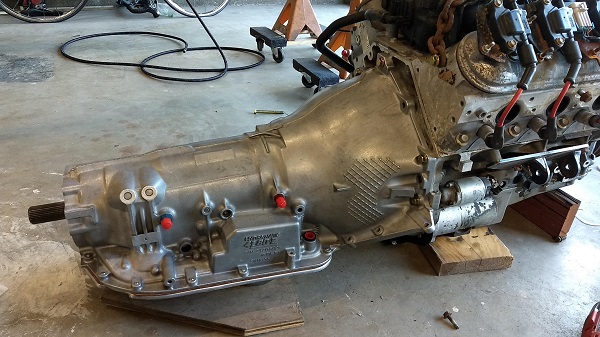 We primed, painted, and installed the pre-welded LS motor mounts that come in the GenRight Tracer Kit. Then we lifted the motor and transmission into place with our hoist. With a little lubricant on the bushings and some pushing and pulling, the engine and trans bolted right up.
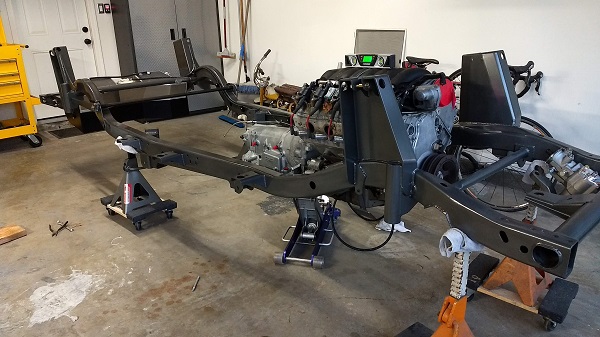
The exhaust comes next. This part of the project can be slow-going and requires more patience than other parts of the build. This was especially true for us since we were going to try something new and unconventional. We noticed that the clearance on the driver’s side was going to be tight for an upper link, drive shaft, and a 2.5” exhaust tube. So we ran the driver’s side exhaust over the motor and down the passenger side. There is about 10” of space above the motor because it sits so low in the Jeep— no clearance issues there!
We built our own headers and entire exhaust system from stainless steel. We bought a set of stainless header flanges, some straight 2.5” and 3” tubes and a bunch of 180-degree bends in 1.75”, 2.5” and 3” diameters.
We started by finding the best spot on the passenger side to fit the 4-into-1 collector and the 2-into-1 wye pipe that will connect to the driver’s side. It was very tight, but by clocking the two pieces until everything cleared, we made it fit. Next, we built the passenger side header which took one of us about a full day to cut and tack up. 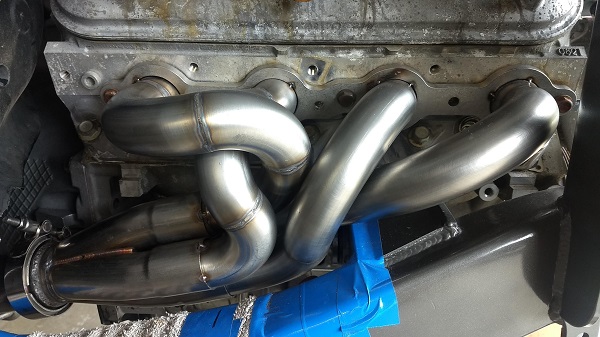
Then off to the driver’s side. Before attacking this side, we mocked up the steering shaft to see how to get around it. Turns out the best route was to go out and around the shaft, so the shaft actually runs through the header tubes. It came out great. 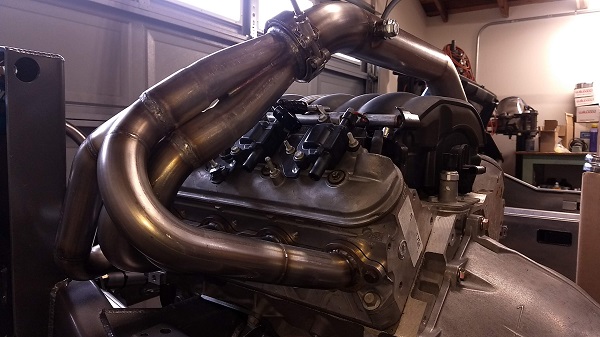 We followed up by running the 2.5” pipe from the collector to the wye on the passenger side. We also welded in an O2 bung for the sensors just downstream of both collectors.
 Now all that was left is to figure out the muffler location and tail pipe. We are using a Borla stainless steel straight-through muffler with 3” inlet and outlet. With a couple of bends, we ran the tailpipe from the muffler up and over the driveline and upper links and out a 3.5” hole we cut in the driver’s side rocker guard. This will keep the noise on the driver’s side, so more sensitive passengers won’t be bugged by the sound of the LS. 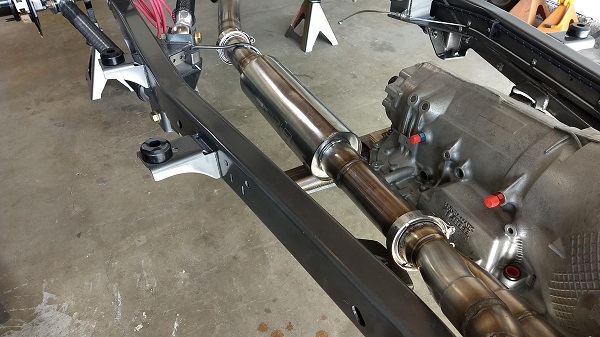
We TIG welded the entire system, mostly without filler rod. The key here is the fit up. Using a 10’ disc sander we fine-tuned the cuts to make a tight joint. We discovered that sanding and de-burring without beveling the edges worked best because the sharper edges are easier to weld with no filler rod. We also made sure to clean the parts first with a scotch bright and then with acetone just before making the weld.
Stainless steel welding requires a purge of Argon. To do this, we taped the ends of the tubes creating a contained environment that would hold the gas coming from a separate Argon bottle and regulator. With the welder set on about 60 amps and a fresh bottle of Argon, the welding was done, and the exhaust system looks great!
Depending on what’s left of our budget, we might have it ceramic coated or wrapped in heat-shield later on.