We all know GenRight Off Road is famous for their well-designed and great looking after market Jeep parts. But did you know they’ve been working on their new suspension kit for the Jeep LJ? It has just been released to the public and it gets its name from Trail Tested and Race Proven: Tracer. Tracer was developed over many years of competition in the 4500 class King of the Hammers as well as countless hours on trail-runs all over the country.
This kit is truly one of a kind. The Tracer base kit features coil-over shock towers on all four corners, a full 5” of up-travel, and a very low center of gravity. It also includes LS motor mounts, GM 4L80 automatic transmission mount, full belly and engine skid plates, extended wheel base to 115”, and bump stop cans and limit straps on all four corners.
Some parts aren’t in the base kit but are required to complete this install: a custom radiator and fan setup that comes with a new pitman arm and tie-rod kit. Optional, but highly recommended, is the Tracer specific sway bar by GenRight. And because GenRight has trail-tested all the best equipment, they recommend using the following parts with their new Tracer Suspension: Currie 60 or 70 Rockjock axles; PSC Tracer specific hydraulic assist steering system; GenRight high-line front fenders and hood; 40 or 42” tall tires; 17 x 8.5” wheels with 4.5” backspacing; Fox or King shocks and bump stops; and a GenRight all aluminum fuel tank and skid plate. Of course, you can choose to use other parts, but GenRight can guarantee neither fit nor function if you do. For our build, we decided to go with the professionals’ recommendations!
The great thing about this is once you’ve decided to go with the GenRight specified list of parts, you will have nothing left to figure out. Determining link locations and length, shock placement, motor mount angle and location, placement and angle of trans mount, sway bar location, articulation, up travel, droop, and so much more -- all this hard work is done for you.
For Money Pit, this means moving our build forward much faster. We’re even able to build in what some might say “out-of-order” because we can do things like weld up and paint the entire frame without having the axle side brackets welded.
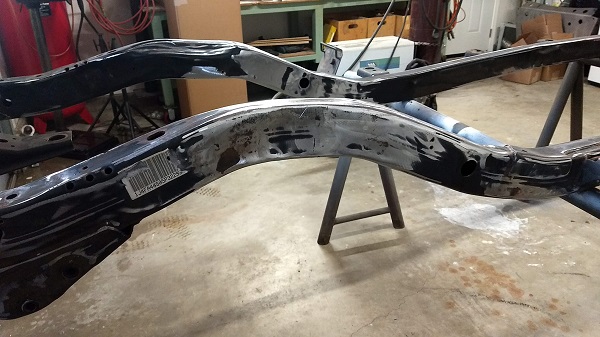
Removing Stock Brackets
The first thing the instructions say is to remove most of the stock suspension bracketry. We have done this type of work on previous builds, so we knew right where to start and how to get it done quickly. But even if you’ve never done this kind of thing before, GenRight supplies a very easy-to-read diagram showing which pieces to remove.
The thin steel stock brackets with just-adequate welds makes this job easy, but it can also be frustrating if you’re not careful. Serious damage can be done to your frame if you cut too deeply and can take hours to repair! So we proceeded with a light hand on the cutting wheel.
We found the easiest, cleanest, and fastest way to remove any bracket was to treat the weld as if it was a hinge. Using a 1/16” cutoff wheel, we scribed the weld without touching the frame material.
Then we cut the bracket so that each piece had only a straight weld attaching it to the frame.
At that point, we used channel locks to bend the piece back until the weld broke.
If it hadn’t given up that easily, we would have scribed the weld a little deeper. This method left only about half of the weld still attached to the frame.
We took a 4.5” grinding wheel to the weld, grinding it almost flush to the frame. For final clean-up, we sanded where the weld used to be with a 4.5” 80 grit sanding disc. All told, bracket removal and clean-up took just about six hours.
At this point, we were hungry and needed to grab some more cutting wheels. Good thing that In-n-Out and Home Depot are share the same parking lot! It was off to eat and restock so we could finish the job the next day.
Tracer Suspension Install
We headed out to the garage the next morning with the plan to install the Tracer Suspension kit. And, oh man, are we glad we got some insider advice to get a good digital level and use it to level the frame side to side and front to rear before moving forward! We found twists and bends we didn’t know were there and confirmed the presence of some we had suspected.
After leveling, we cross-taped all the frame ends and body mounts to verify the condition of the frame. We discovered that, because our LJ had been hit in the front end, it was out of square and twisted a little. Our frame definitely needed some work, and even though that was not ideal, we were happy to discover and fix the problems before installing any parts. We used a chain hoist to bring it back to square; we also used some ingenuity and some long 2x6's to leverage out the twist.
Finally straight, square, and level, we moved on to step one of the actual installation: the front track bar mount and brace. GenRight provides a template that keys into an existing hole in the frame, and easy as that, we tacked the mount in place.
Next, the passenger side required a notch in the frame for the steering linkage. A small bracket aligns with some holes and lays out the cuts on the inside of the frame
So all we had to do was transfer the lines across the bottom and onto the outside and use the bracket to layout the cut. We used a cutoff wheel to make short work of the notch.
Simultaneously, the bracket and support tube slid into place and we tacked them on along with the GenRight supplied pre-bent filler plate for the notch.
GenRight’s instructions kept us on track; the front shock towers fit nicely so we marked their location with a Sharpie and removed the paint in the weld areas.
Then we set both towers in place, running a bar clamp across the top to keep them in the correct location. After finish welding the bump cans and brackets (they come tacked together)
We placed them in the slots in the tower and clamped them to the frame.
We removed the towers and welded on the cans. We then reinstalled the towers, checked all dimensions one more time, and tacked them into place. Locating the position of the front limit strap tabs off the towers was easy, so we tacked them on, too.
After just a couple of hours, we had the front shock towers and bump stop cans installed, so it was time to tackle the frame side link mounts and skid plate. We bolted them together using the supplied hardware and set them into place. With a bar clamp on the frame to hold the dimension specified in the instructions, we flipped the entire frame over making it easier to handle the large assembly. Located off a slot in the factory frame, the assembly fit perfectly!
With the frame side link mounts and skid plate secured, we turned the frame back over and moved on to the sway bar. The GenRight sway bar is self-locating with brackets that key into holes in the frame so it was super easy to install.
The templates for the rear shock towers showed us where to notch the frame. Per the directions, we used a cutoff wheel to remove the top, bottom and outside of the frame tube, leaving the inside wall in place. The instructions walked us through assembling the rear towers before placing them on the frame.
Once we tacked the towers together, we tried persuading them into the frame cut, but a quick check with our digital level told us that the force we applied knocked the frame into a twist. So, reminding ourselves that making progress requires corrections, we backed up, broke the tacks, and un-installed the towers. Cutting the notch a little bigger did the trick, and the towers slipped back in easily this time. We tacked them in place and rechecked for level. All was good.
Following the rear shock tower installation, we pre-welded the inside of the bump cans just like up front, placed them into the keyed location in the tower gusset, and tacked.
We used a 1-3/4” hole saw to cut the frame through the towers for the piece of DOM that ties the rear towers together. Once the holes were cut, we tacked the DOM in place and installed the body mounts to the dimensions given in the instructions.
Then it was time to tackle the motor mounts. We used the supplied fixture to hold the motor mounts at the correct distance apart. Then we used the GenRight templates to position the mounts front to rear. After double-checking, we tacked them in place and moved on to the motor skid.
First, we used the GenRight Tracer kit bracket to bolt the motor skid to the belly skid. With that done, we were able to build the forward motor skid plate mounting brackets that hang from the previously installed motor mounts.
The pre-welded transmission cross member just bolts in place with supplied hardware.
After all the installed components were tacked in, we checked for level and straight again and clamped the entire frame to out steel saw horses to keep it that way. Final welding was all that was left, so with the clock telling the day was about done, we cleaned up and put tools away. We’d get back at welding in the morning.
A solid day’s work, for sure, but we had completed it in about 8 work hours. We felt really good about the what we had accomplished, so we cracked open a couple cold ones and sat down and checked out our work.
First, we remarked that it’s abundantly clear the GenRight Tracer kit is well-engineered. The experience behind the product and GenRight’s dedication to quality and safety really shines through, especially in parts like the shock towers that are engineered to maintain the structural integrity of the frame.
Secondly, the workmanship on this kit is second to none! The welds are beautiful; to say they are works of art is no overstatement. These guys really know their craft! Not only are the welds pretty to look at, but they also inspire great confidence in the reliability of the parts. Nobody wants to be stuck on the trail with broken welds, and GenRight goes the extra mile to make sure this won’t be the case. I just wish our welds were as good!
Finally, the right guidance is essential in making this project do-able for the average guy with common tools. GenRight comes through in this aspect, too! The easy-to-follow instructions and templates made this project a breeze.
Time and Tools
After final welding (about 4 hours), we clocked a total of 12 hours installing the Tracer suspension kit on our frame.
We completed this project using the following tools:
Welder-Hobart 210 with 75/25 gas mix
Grinder with cutoff wheels, grinding wheels, and sanding discs
Vise grip clamps
Bar clamps
C-Clamps
Digital level
Sharpie
Straight edge
Tape measure